Leveraging Backend As A Service: Building A Plant Diary With Supabase

Most front-end engineers consider the technical effort required to build the backend component of their amazing ideas to be too overwhelming, so they back out of them. But what can be done to cut down on the backend work? - Backend as a Service platform (Baas)!
In this tutorial, you will learn about Supabase and the benefits it provides as a ‘backend as a service’. You will build the backend components of a plant diary using Supabase.
Read on to learn more.
Prerequisites
This tutorial contains hands-on technical steps. Be sure to have the following to follow along.
An existing GitHub account. Supabase will use your GitHub account when creating an account.
Node.js installed on your local computer. Node.js version 14 was used in preparing this tutorial.
A basic understanding of JavaScript and React.js. The Frontend application in this tutorial will be built using Gatsby.
Introduction
A Backend as a service (BaaS) provides services that make up the server side layer of an application. Although they are offered as a service, the smaller services within the BaaS are often paid for by developers. These services include authentication, data and file storage, APIs for external data interaction, and push notifications.
To experience the features of a Backend as a service solution, you’ll use Supabase to create a backend for a digital plant diary using Gatsby for the frontend.
Before you proceed further, let's consider what Supabase is and the benefits it offers.
What is Supabase?
Supabase is an open source example of a BaaS and it provides a web interface, an API and client SDKs for developers to create and design their backend logic. Supabase provides developers with out-of-the-box authentication, storage, and API solutions to use in building frontend applications.
Each product built using Supabase is contained within a project. A project provides you with a relational Postgres database and storage buckets for storing blob data uploaded as files. A user management system with several authentication providers is also provided to authenticate users.
Supabase claims to be an alternative to Firebase, a more complex and mature BaaS offered on the Google Cloud. However, one major difference between the services is the database offered. Supabase offers a Postgres database for relational data, while Firebase offers a NoSQL database. Firebase however, offers services that have not yet been developed on Supabase such as Firebase Cloud Messaging.
Supabase provides a simplified web interface to design your backend. At the click of a few buttons within the Supabase dashboard, you will build the backend service of the plant diary application. You will use the Supabase free pricing plan to avoid incurring charges for the project.
Let’s get started!
Creating A Supabase Project
Now that you understand what Supabase is and the benefits it provides, let’s take a step forward by creating a Supabase project to be used for the plant diary.
You will use Supabase to create a backend for a plant diary project. This project requires you to store observations of a plant in a database table, and an image of each observation in a separate storage bucket. It is assumed that the application will be used by only you and that there is no sensitive data, hence authentication and user management are left out.
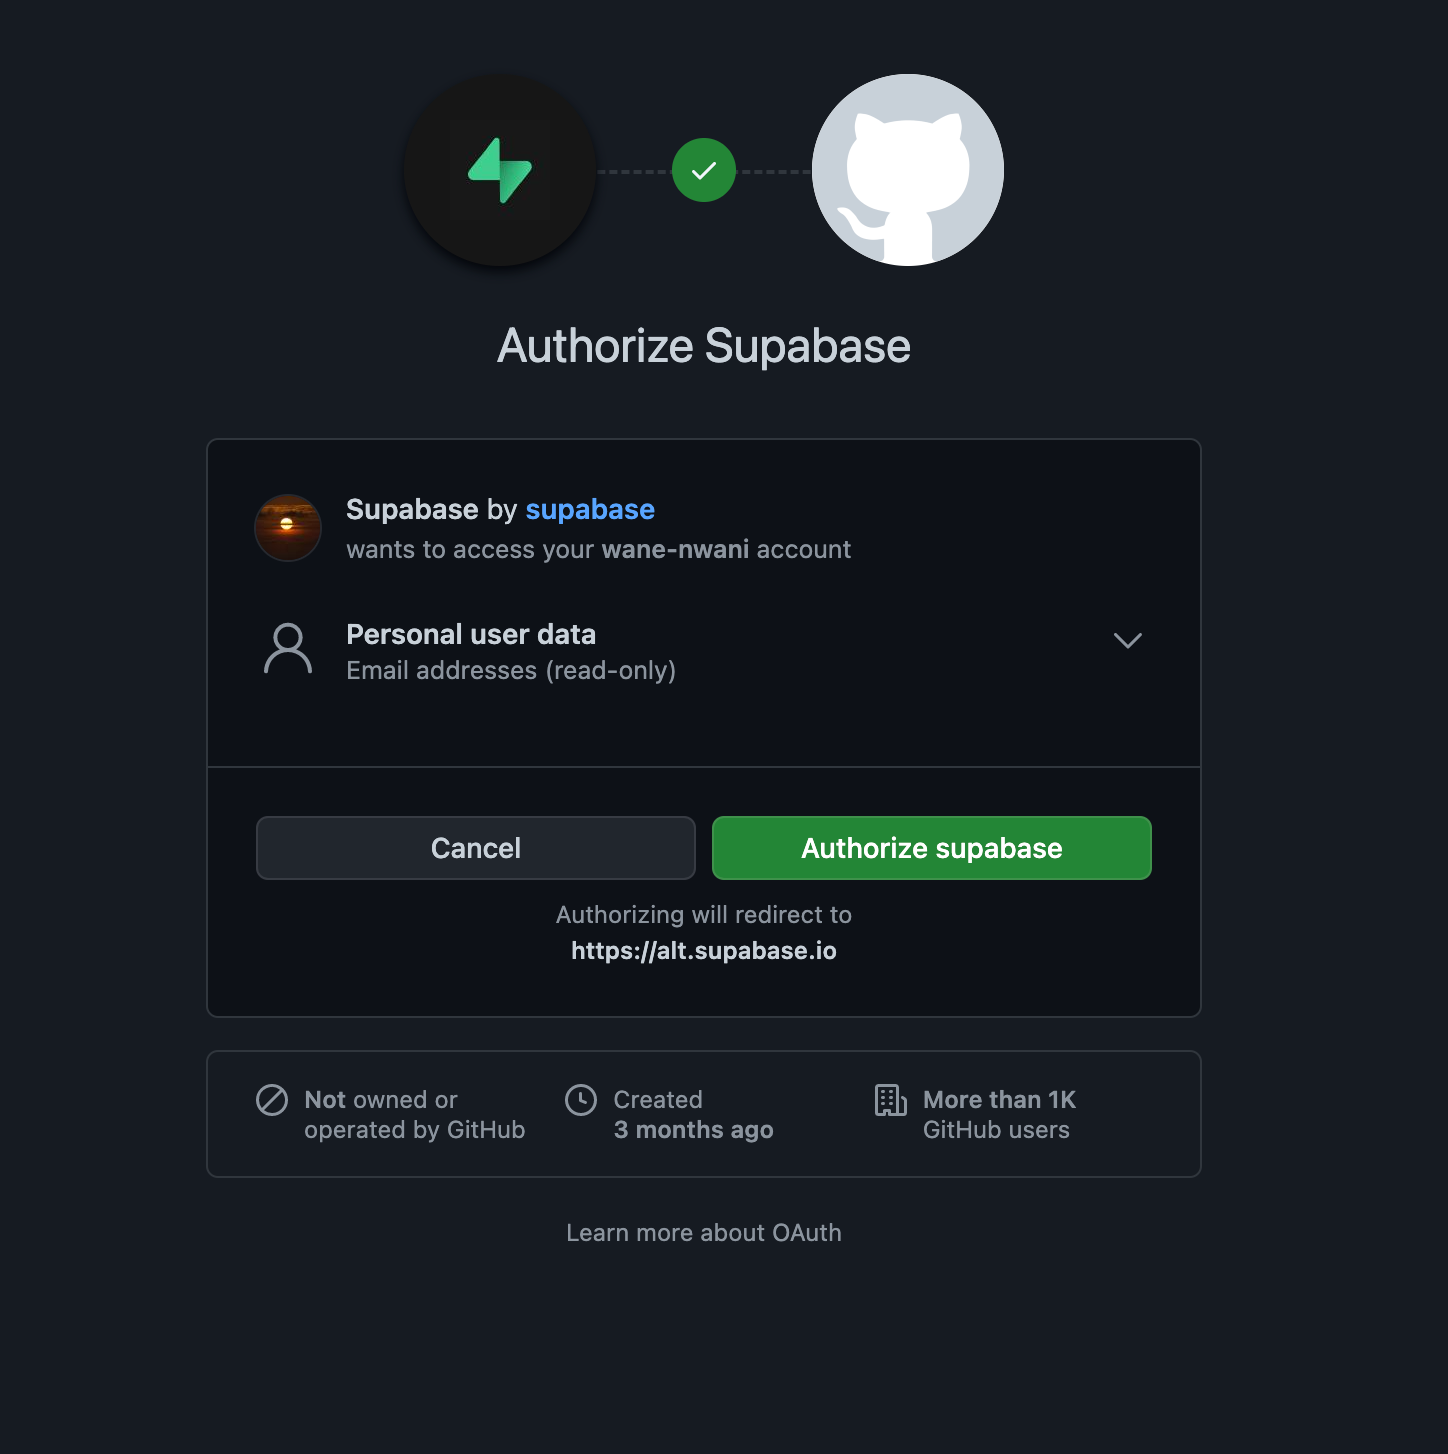
- Open your web browser and navigate to the Supabase dashboard to create an account using your GitHub account.
Be sure to grant Supabase’s permission request to access your GitHub email.
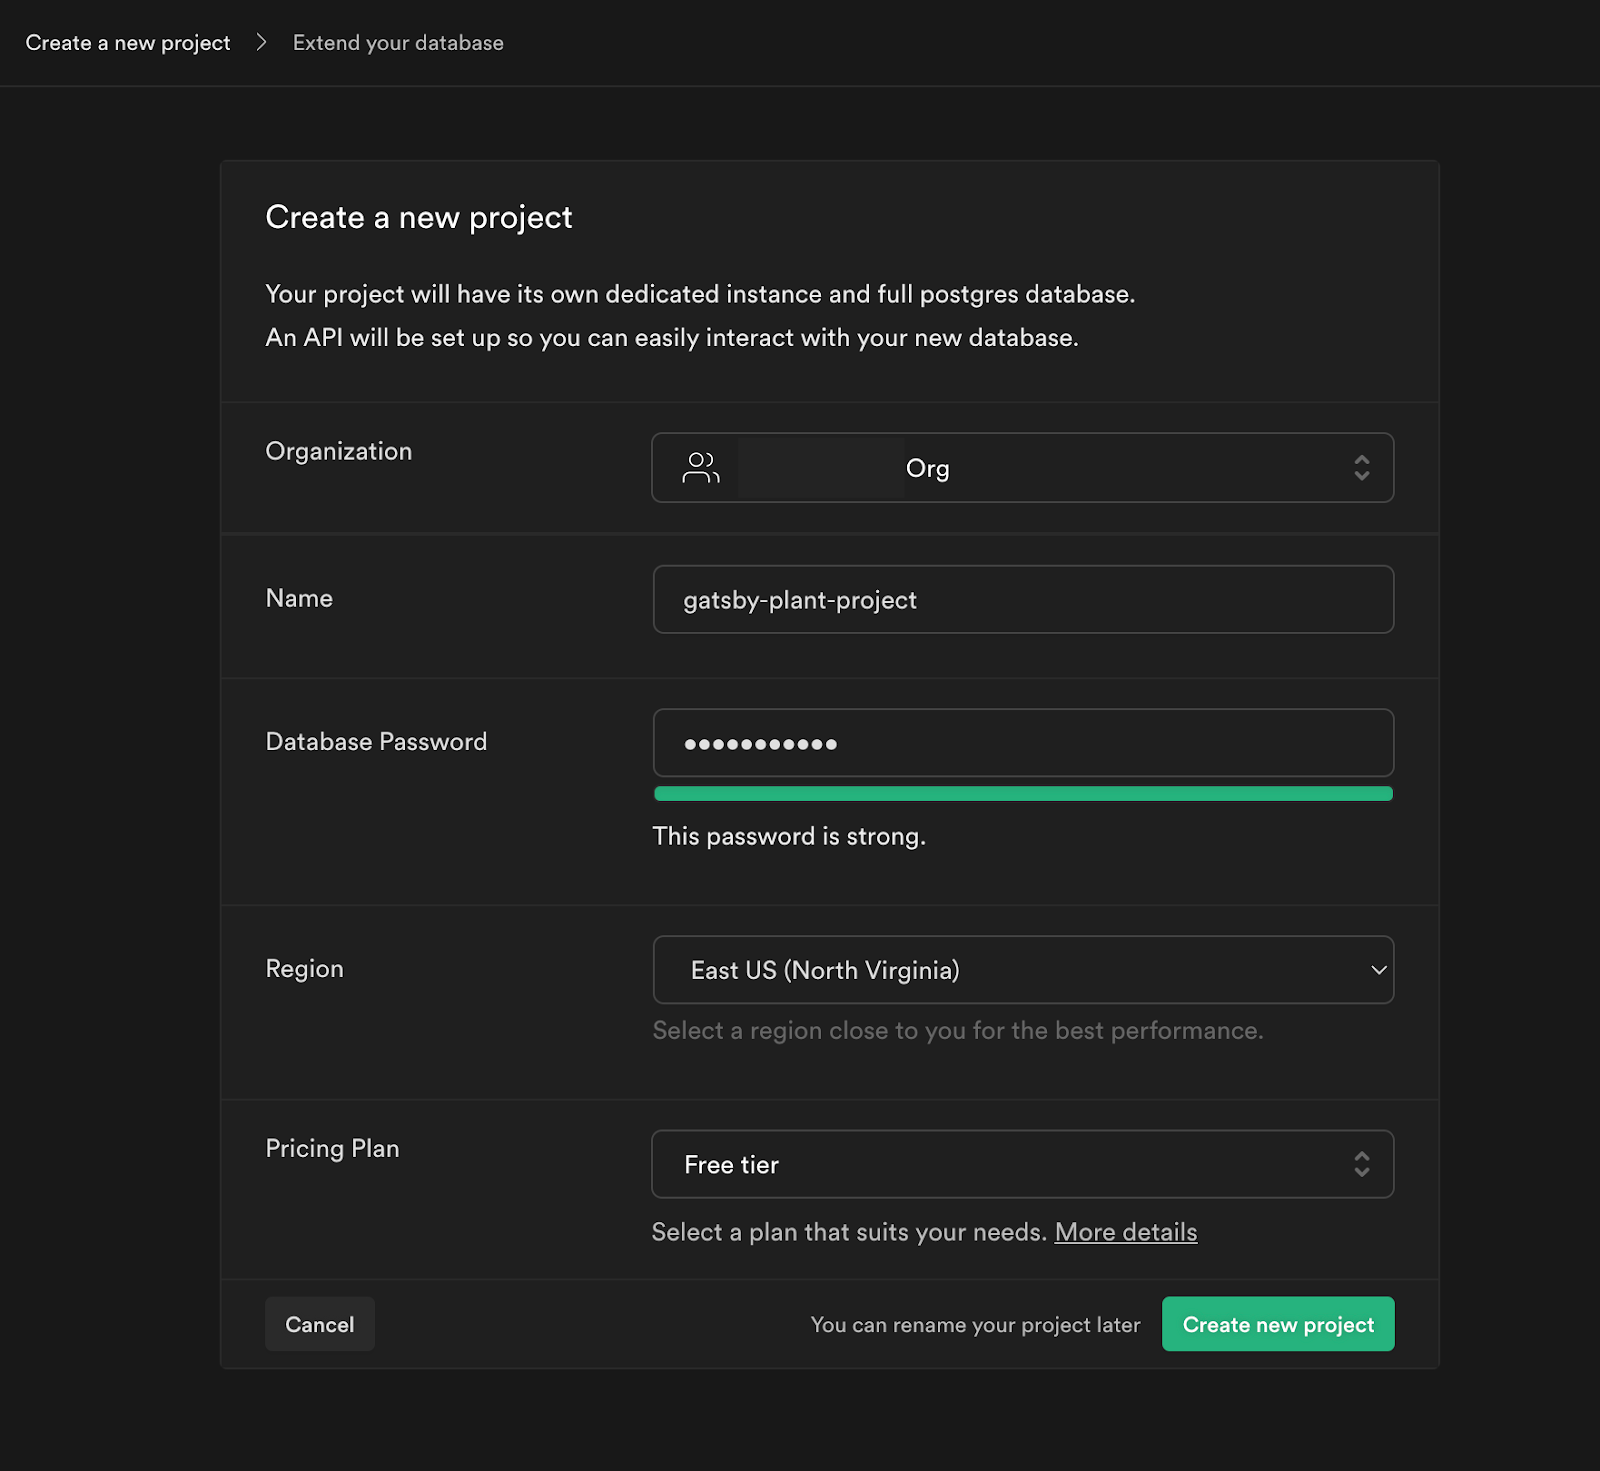
- Click the New Project button to start the process of creating your first project.
Provide the needed information for your new project in the input fields and click the Create new project button to provision your project’s resources. The wait time for provisioning a new project takes 5 - 10 seconds.
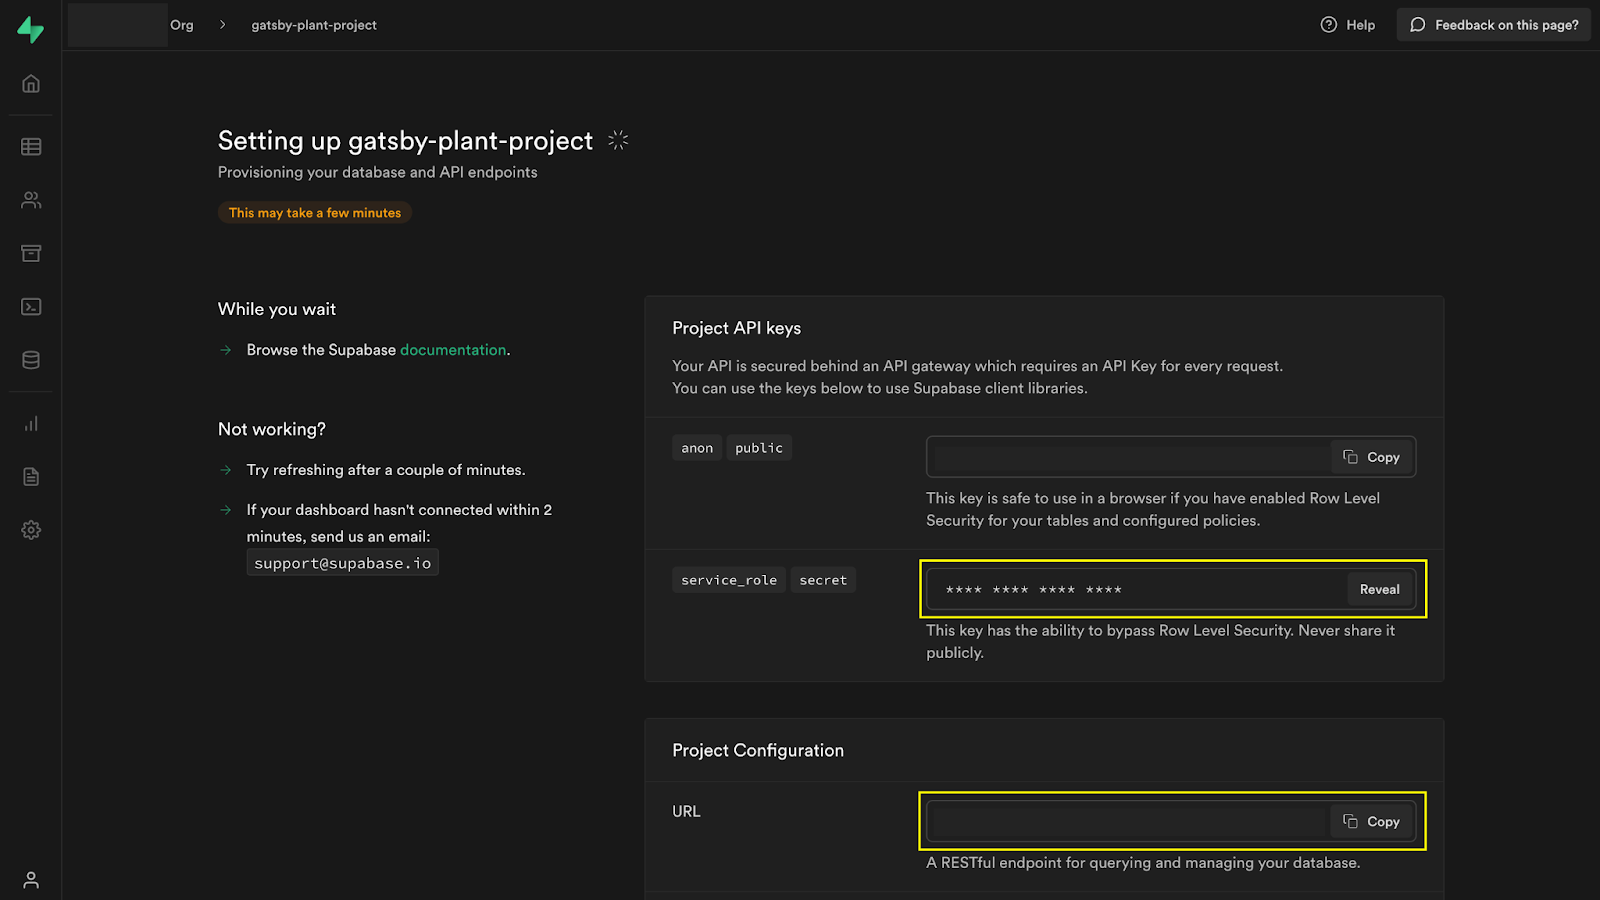
- Open a secure local notepad on your computer to note down the credentials of your project.
Store the values of the service role secret and Project URL credentials. You will need these credentials when connecting a frontend application to the Supabase project.
Modeling the Application Data
In the previous section, you created a Supabase project containing an empty postgres database. In this section, you will model the database schema by creating a table with columns through the Supabase console.
You will create an observation table with four columns to store the daily observations you have on your plant’s growth.
- Click the database icon in the sidebar to navigate to the database section of the Supabase console.
In the default Tables section, click the New button to create a table to store user data.
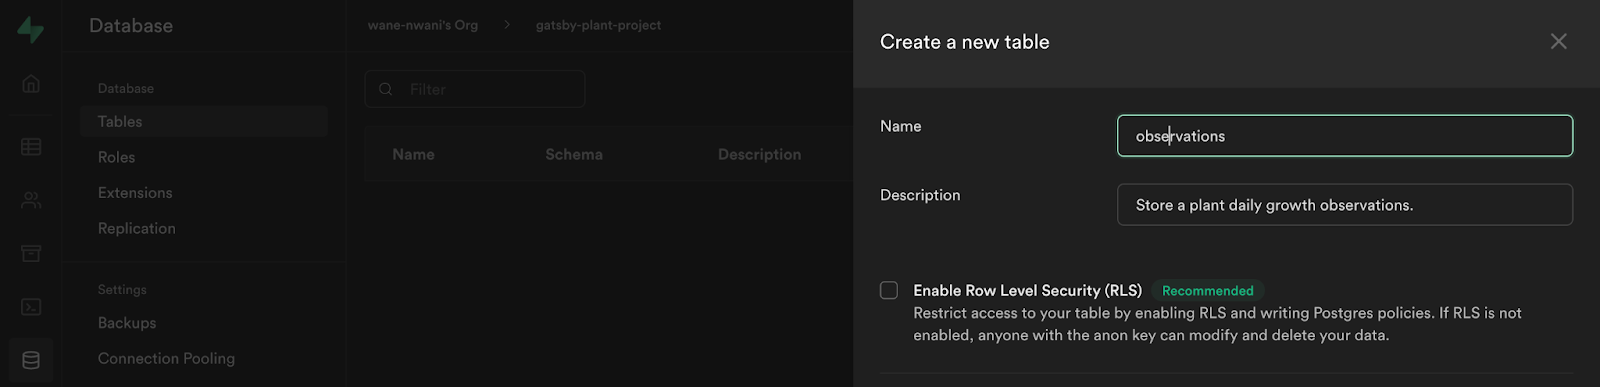
- At the Create a new table side modal, type in observations as the table name and your preferred description in the Description input field.
Do not click the Save button yet as the database columns have not yet been added.
Click the Add Column button to add four columns to the observations table.
A summary column with a varchar type to store a one line summary of the day’s observations.
A description column with a text type to store a full description of the day’s observation.
A water_level column with a float4 type and 0.0 as the default value. This column will store the amount of water given to the plant for the day.
A plant_height column with a float4 type and 0.0 as the default value. This column will store the last height of the plant measured.
An image_url column with a varchar type and https://bit.ly/3I5pkhP as the default value. The image_url column will store the url to a plant’s image after it has been uploaded. The default value of the image_url field links to a default image that will be used when you do not upload an image for the day.

Click the Save button to save the table and the columns that were added.
Creating A Storage Bucket
At this point, you now have a structured database for storing daily observations on the growth of your plant. Let’s implement how images of the plant’s growth will be uploaded and stored within the Supabase project.
While it is possible to store blob data in your database, it is recommended that you do not, one reason being that blob files take a large amount of space. A recommended approach is to place the blob file in a blob storage and then store a link to the file using its URL.
Supabase provides a dedicated storage feature for blob data within your project. To begin storing files, you need to create a storage bucket through the Supabase dashboard or npm package. The steps below outline the process of creating a storage bucket through the Supabase dashboard.
- Navigate to the Storage section of the supabase dashboard to create a bucket.
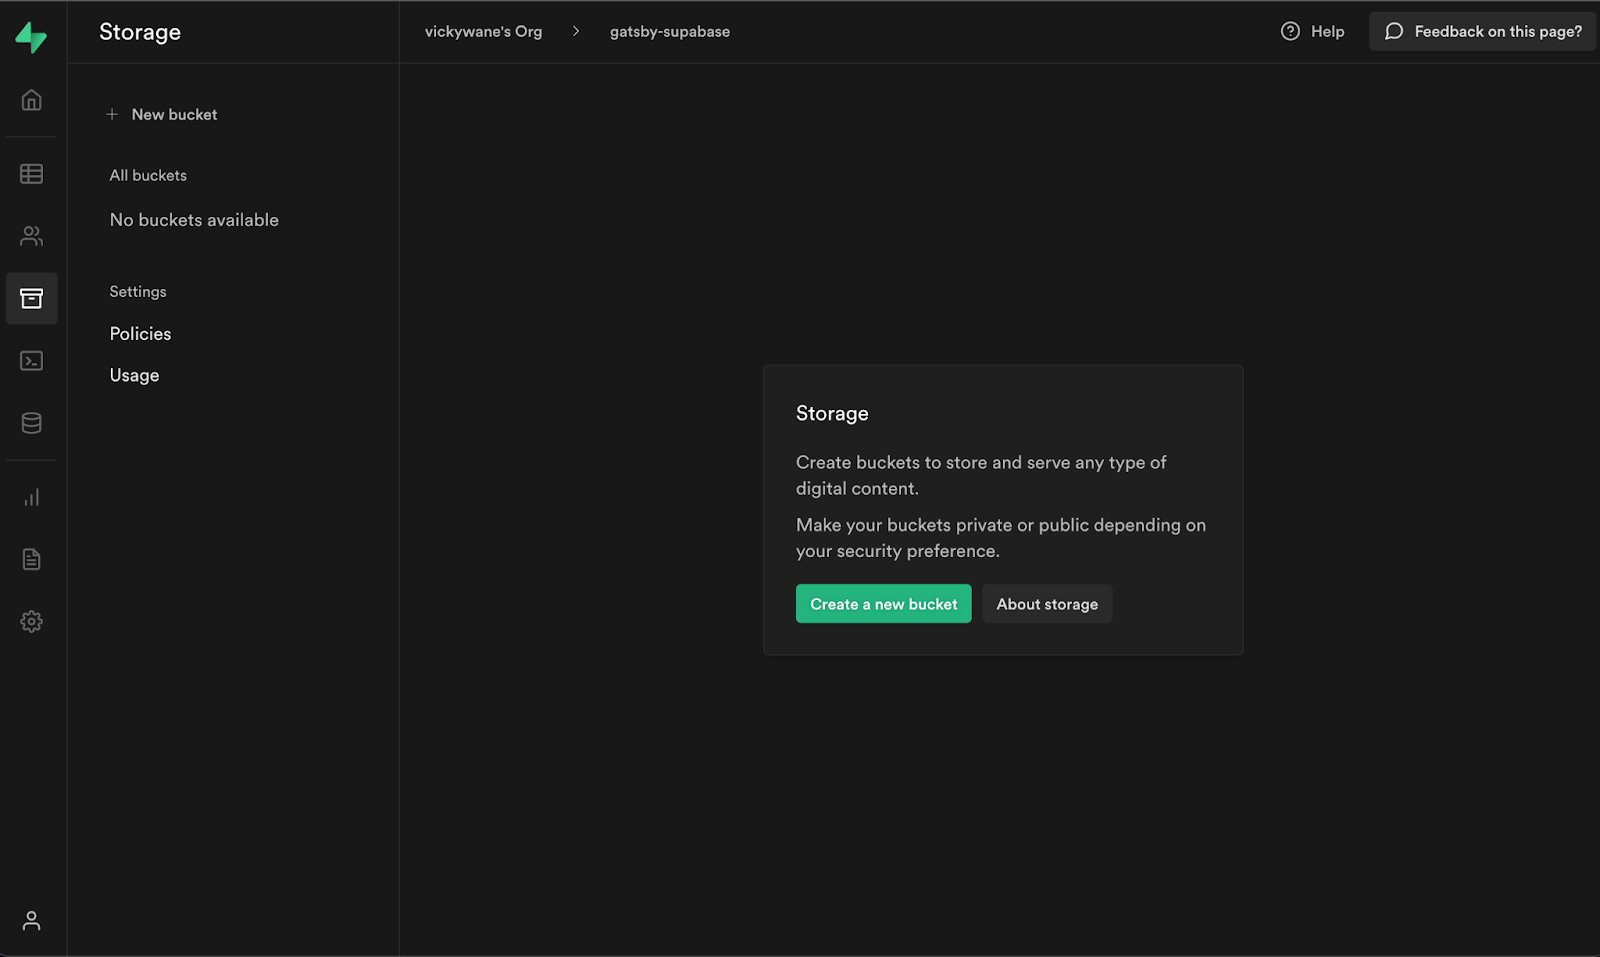
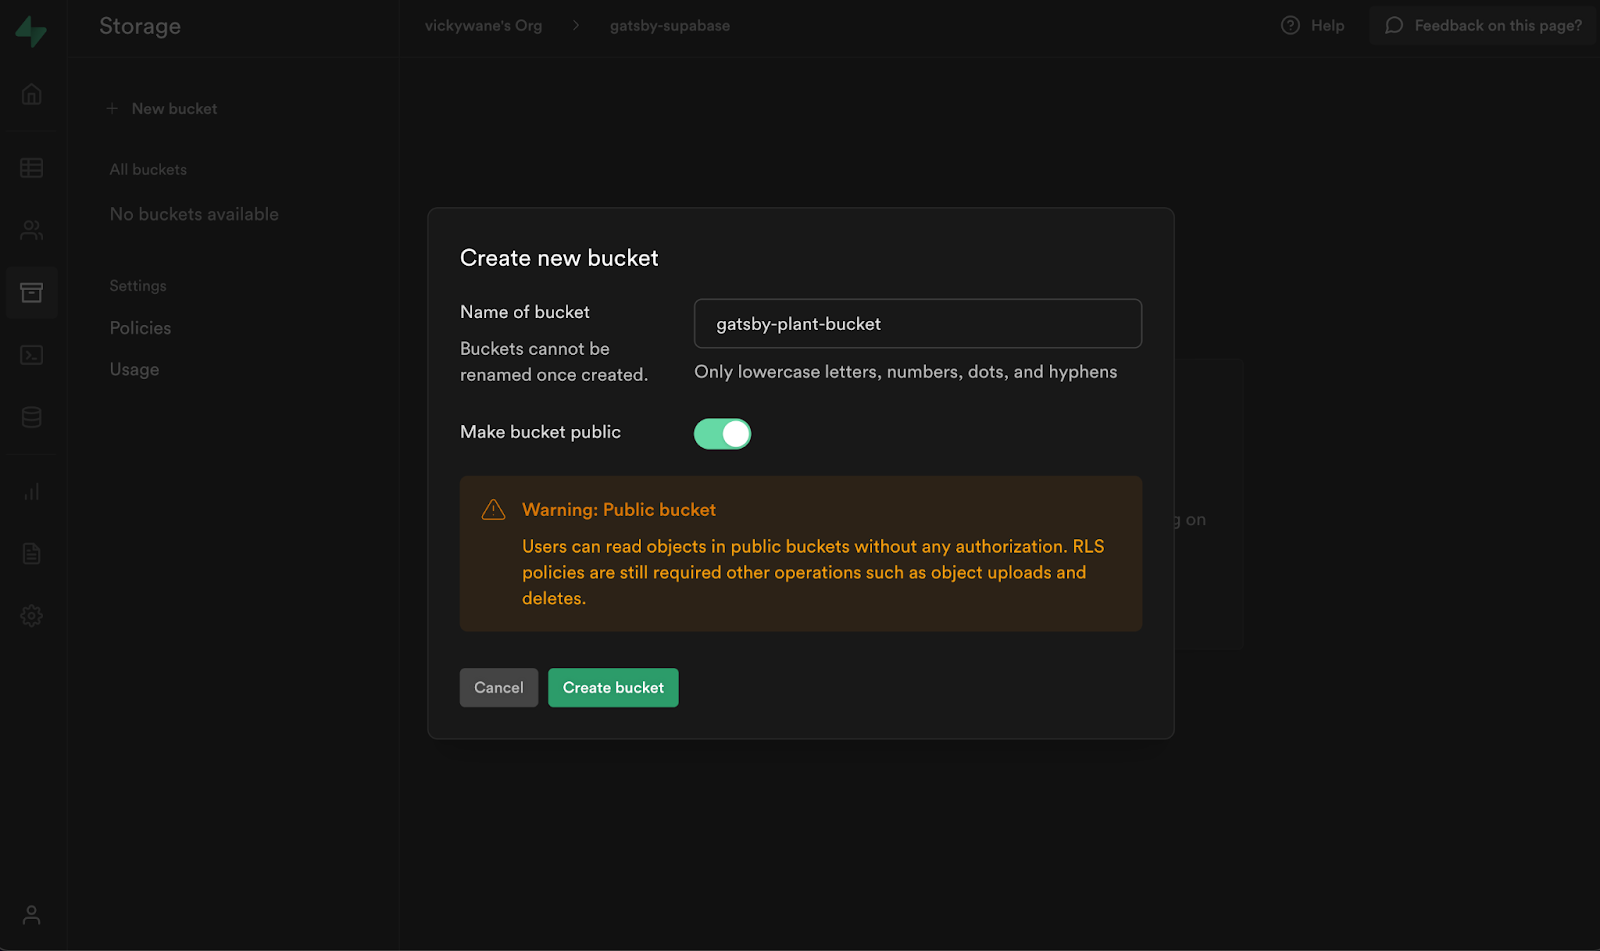
Click the Create a new bucket button to launch a dialog where you will provide the details for the new bucket.
Click the Make bucket public toggle switch to make files stored in the bucket accessible over the internet without authentication. You will not be implementing user authentication in this tutorial, hence there will be no way to view the files if they were protected.
At this point, you have completed the basic steps to create the resources for a Supabase project. You will now proceed to interact with the Supabase project from a frontend application through the JavaScript package.
Building The Frontend Application Using Gatsby
Gatsby is one of the fastest and lightest frameworks within the React ecosystem for building single-page applications.
You will use the supabase-js NPM package to connect the web application to your Supabase project, and also use the React Context API to manage the application’s state.
Bootstrapping A Gatsby Application
To begin the process, launch your computer terminal and execute the npx command below to create a new project using the Gatsby interactive installer.
npx gatsby new
Next, execute the NPM command below to install the supabase-js NPM package.
npm i @supabase/supabase-js
Open the Gatsby project in your preferred code editor, as you will be making several edits to the application in the next sections.
Create an .env.development file within the Gatsby project folder and add the Supabase credentials displayed when a project on Supabase was created.
Note: You will find the Supabase credentials in the API section of the Supabase web dashboard for your project.
GATSBY_SUPABSE_URL=SUPABASE_URL
GATSBY_SUPABSE_KEY=SUPABASE_KEY
The .env.development file contains sensitive credentials that should not be committed into a repository. The next step will guide you on how to securely store the .env.development file.
Open the .gitignore file and add the .env.development filename to prevent git from tracking the changes within the .env.development file.
node_modules/
.cache/
public
.env.*
You will use the Supabase credentials when creating the useContext reducer functions to establish a connection with your backend project on Supabase.
Creating the Application State
- Create an
appState.jsfile within thesrc/pagesdirectory and add the content of the code block below into theappState.jsfile to create an object holding the application state values.
// src/appState.js

const initialState = {
   allGrowthObservations: [],
   isSavingData: false,
   errorOccurred: false,
   homeView: { isJottingObservation: false },
   uploadPlantImage: () => {},
   setHomeView: () => {},
   saveObservation: () => {},
   fetchObservations: () => {},
   dispatch: () => {},
}
- Add the code block below to the existing code in the
index.jsfile. The new code added will create a React context and a supabase client using the two imported packages.
The createClient method from the supabase package authenticates with your project on Supabase through the GATSBY_SUPABASE_URL and GATSBY_SUPABASE_KEY values that you specified in the .env.development file.
// src/appState.js

import React from "react";
Import { createClient } from "@supabase/supabse-js";

// existing initialState code

const supabaseClient = createClient(process.env.GATSBY_SUPABASE_URL, process.env.GATSBY_SUPABASE_KEY)
export const AppContext = React.createContext(initialState)
- Add the function in the code block below into the
index.js. The code block contains a function to mutate the object values added in step 1 for the application state.
// src/appState.js

const reducer = (state, action) => {
   switch (action.type) {
       case "FETCH_GROWTH_OBSERVATIONS":
           return {
               ...state,
               allGrowthObservations: action.payload,
           };
       case "SUBMIT_GROWTH_OBSERVATION":
           return {
               ...state,
               allGrowthObservations: action.payload,
           }
       case "HANDLE_ERROR":
           return {
               ...state,
               errorOccurred: true,
               error: action.payload
           }
       case "HANDLE_HOME_VIEW":
           return {
               ...state,
               homeView: {
                   isJottingObservation: action.payload
               }
           }
       default:
           return state;
   }
};
Modify your index.js file to contain the content of the code block below. The code block contains a React component that will serve as a Higher Order Component (HOC) to wrap the entire Gatsby application.
The code block below also contains three functions to create and retrieve the plant observations. The uploadPlantImage function will be executed to upload the image of a plant into your Supabase bucket.
export const AppProvider = ({children}) => {
   const [state, dispatch] = React.useReducer(reducer, initialState);

   const saveObservation = async ({summary, description, plantImage, plantHeight, waterLevel}) => {
       dispatch({type: 'HANDLE_LOADER', payload: 'submitLoader'})

       try {
           const {data: new_observation, error} = await supabaseClient
               .from('observations')
               .insert([
                   {
                       summary,
                       description,
                       plant_height: plantHeight,
                       water_level: waterLevel
                   },
               ])

           if (error) {
               console.error(error)
               return
           }

           if (plantImage) {
               await uploadPlantImage(plantImage, new_observation[0].id)
           }

           dispatch({
               type: 'SAVE_FETCHED_OBSERVATIONS',
               payload: [...new_observation, ...state.allGrowthObservations]
           })

           setHomeView(!state.homeView.isJottingObservation)
       } catch (e) {
           console.log(e)
       }
   }

   const fetchObservations = async () => {
       dispatch({type: 'HANDLE_LOADER', payload: 'homeLoader'})

       let {data: plant_observations, error} =
           await supabaseClient
               .from('observations')
               .select('*')

       if (error) console.error(`Error fetching observations: ${error}`)

       dispatch({type: 'SAVE_FETCHED_OBSERVATIONS', payload: plant_observations})
       dispatch({type: 'HANDLE_LOADER', payload: ''})
   }

   const setHomeView = (newView) => dispatch({type: 'HANDLE_HOME_VIEW', payload: newView})

   const uploadPlantImage = async (file, observationId) => {
       try {
           const {data: uploadData, error: uploadError} = await supabaseClient.storage
               .from('gatsby-plant-bucket')
               .upload(`${file.name}`, file)

           if (uploadError) {
               console.error(uploadError)
               return
           }

           const { error: updateError} = await supabaseClient
               .from('observations')
               .update({image_url: `${process.env.GATSBY_SUPABASE_URL}/storage/v1/object/public/${uploadData.Key}`})
               .eq('id', observationId)

           if (updateError) {
               console.error(`Image update failed: ${updateError}`)
           }

       } catch (e) {
           console.log(e)
       }

       dispatch({
           type: 'HANDLE_LOADER', payload: null
       })
   }

   return (
       <AppContext.Provider value={{
           ...state,
           dispatch,
           saveObservation,
           fetchObservations,
           setHomeView,
           uploadPlantImage
       }}>
           {children}
       </AppContext.Provider>

   )
}
While building the application interface in the next step, you will import the AppProvider HOC and reducer functions to access and mutate the application state.
Creating the Application Interface
The diary application will have a single page where you can create new observations and view the existing observations of your plant.
To get started, create an index.css and add the content of the code block below into the index.css file to style the entire application.
/*./src/index.css*/

.content-ctn {
   background: #fff;
   transform: translateY(-50px);
   width: 90%;
   border-radius: 8px;
   padding: 1rem;
}

.align-center {
   display: flex;
   justify-content: center;
   align-items: center;
}

.flex-between {
   display: flex;
   justify-content: space-between;
}

button {
   height: 40px;
   padding: 0 30px;
   border-radius: 5px;
   border: 1px solid #2ECA38;
   transition: all 300ms;
   background: #2ECA38;
   color: #fff;
}

button:hover {
   cursor: pointer;
   background: transparent;
   color: #2ECA38;
}

.hero-container {
   background-image: url('../images/leaves.jpg');
   width: 100%;
   height: 400px;
   object-fit: cover;
   display: flex;
   justify-content: center;
   flex-direction: column;
   align-items: center;
   color: #fff;
}

.container {
   width: 100%;
   height: 100vh;
   background: #2ECA38;
}

.input {
   border: 1px solid #000;
   width: 100%;
   padding: .7rem;
   box-sizing: border-box;
}

label {
   margin-bottom: 20px;
}

.list-container {
   list-style: none;
   display: flex;
   margin-bottom: 2rem;
}

ul, li {
   padding: 0;
   margin: 0;
}

.summary-img {
   height: 100%;
   width: 100%;
   border-radius: 10px;
   object-fit: contain;
}

.list-content {
   margin-left: 20px;
}

.list-image-container {
   display: flex;
   justify-content: center;
   align-items: center;
   background: #2ECA38;
   width: 200px;
   height: 130px;
   border-radius: 15px;
}

.title {
   font-size: 1.3rem;
}
Replace the existing code in the pages/index.js file with the content of the code block below. The new code uses the AppProvider HOC from the appState.js file to wrap the entire application.
// src/index.js

import React from 'react'
import '../styles/index.css'
import { AppProvider} from "../state";
import Home from "./Home";

const Index = () => {
   return (
       <AppProvider className="container">
           <Home />
       </AppProvider>
   )
}

export default Index
The code block below uses a Home component to display the entire application. Since it does not exist, you will create the Home component in the next step.
Create a Home.js file within the src/pages directory, and add the content of the code block below into the file.
The Home component uses a useEffect hook to execute the fetchObservations function to fetch all plant observations for a single time after the application is loaded. The value of the allGrowthObservations array is further read and used to populate a list of observations shown on the home page.
The Home component has the following two child components that will be created in the next step.
- The DayObservation component that displays the data for an observation
- The JotObservation component that contains a form for creating observations.
// src/Home.js

import React, {useContext, useEffect } from 'react'
import '../styles/index.css'
import DayObservation from "./dayObservation";
import JotObservation from "./jotObservation";
import {AppContext} from "../state";

const Home = () => {
   const {fetchObservations, allGrowthObservations, setHomeView, homeView} = useContext(AppContext)

   useEffect(() => {
       fetchObservations()
   }, [])

   return (
       <div>
           <div className={'hero-container'}>
               <h1> My Plant Diary </h1>
               <p> A diary about my dear plant.</p>
           </div>

           <div className="align-center">
               <div className="content-ctn">

                   <div className="flex-between">

                       <div>
                           <p> {allGrowthObservations.length} Growth Progress Reported</p>
                       </div>

                       <div>
                           <button onClick={() => setHomeView(!homeView.isJottingObservation)}>
                               {homeView.isJottingObservation ? 'View All Progress' : 'Write Something Today'}
                           </button>
                       </div>
                   </div>
                   <hr/>

                   {
                       !homeView.isJottingObservation
                           ?
                           <div>

                               {allGrowthObservations.length < 1 ?
                                   <p style={{textAlign: 'center'}}>No jots found. <br/> Click the <b>Write Something
                                       Today</b> button to get started.</p>
                                   : (
                                       <ul>
                                           {
                                               allGrowthObservations.map((data) => <DayObservation data={data}/>)
                                           }
                                       </ul>
                                   )}

                           </div>

                           :
                           <JotObservation/>
                   }

               </div>
           </div>
       </div>
   )
}

export default Home
Create a dayObservation.js file within the src/pages directory and paste the code below into the file to create the DayObservation component.
The DayObservation component below receives an object from the Home component containing the data that is displayed.
// ./src/dayObservation.js

import React from 'react'

const DayObservation = ({data}) => {
   const { summary, description, image_url, created_at, plant_height, water_level } = data

   return (
       <li className={"list-container"}>
           <div className={'align-center'}>
               <div className={'list-image-container'}>
                   <img className={'summary-img'} alt={summary} src={image_url}/>
               </div>
           </div>

           <div className={'list-content'}>
               <p className={'title'}>{summary}</p>
               <hr/>
               <p style={{color: 'grey'}}>Observation taken on {new Date(created_at).toLocaleDateString()}</p>
               <p style={{color: 'grey'}}>
                   <b>{water_level}L</b> water of added, <b>{plant_height}</b>CM of height measured.
               </p>

               <p> {description} </p>
           </div>
       </li>
   )
}

export default DayObservation
Create a jotObservation.js file and add the content of the code block below into the file.
The JotObservation component contains an HTML form with input fields to type in an observation. The values from the input fields are stored in the component’s local state and are passed as arguments to the saveObservation reducer function to submit the data to your Supabase project.
// ./src/jotObservation.js

import React, {useState} from 'react'
import {AppContext} from "./appState";

const JotObservation = () => {
   const {saveObservation, activeLoader} = React.useContext(AppContext)

   const [summary, setSummary] = useState('')
   const [description, setDescription] = useState('')
   const [waterLevel, setWaterLevel] = useState('')
   const [plantHeight, setPlantHeight] = useState('')
   const [plantImage, setPlantImage] = useState(null)

   async function handleSubmit(e) {
       e.preventDefault()
       saveObservation({summary, description, plantImage, waterLevel, plantHeight})

       setSummary('')
       setDescription('')
       setPlantHeight('')
       setWaterLevel('')
   }

   return (
       <form onSubmit={handleSubmit}>
           <div>
               <label> Plant growth image </label>
               <br/>
               <br/>
               <input
                   type={'file'}
                   onChange={(e) =>
                       setPlantImage(e.target.files[0])
                   }
               />
               <br/>
               <br/>
           </div>

           <div>
               <label> Today's Growth Summary </label>
               <br/>
               <br/>
               <input
                   onChange={({target}) => setSummary(target.value)}
                   className={'input'}
                   value={summary}
                   placeholder={"One line summary of today's growth"}
               />
           </div>
           <br/>

           <div>
               <label> Today's Height </label>
               <br/>
               <br/>
               <input
                   onChange={({target}) => setPlantHeight(target.value)}
                   className={'input'}
                   value={plantHeight}
                   type={"number"}
                   placeholder={"Measured height of plant today in numbers"}
               />
           </div>
           <br/>

           <div>
               <label> Level of Water Added Today </label>
               <br/>
               <br/>
               <input
                   onChange={({target}) => setWaterLevel(target.value)}
                   className={'input'}
                   value={waterLevel}
                   type={"number"}
                   placeholder={"Litres of water used to water plant today in number"}
               />
           </div>
           <br/>

           <div>
               <label> Jot Today's Growth </label>
               <br/>
               <br/>

               <textarea
                   style={{height: '100px'}}
                   onChange={({target}) => setDescription((target.value))}
                   className={'input'}
                   value={description}
                   placeholder="Write something about today's growth"/>
           </div>

           <br/>
           <button onClick={handleSubmit}>
               {activeLoader === 'submitLoader' ? 'Saving' : 'Save'} Today's Observation
           </button>
       </form>
   )
}

export default JotObservation
Using the Plant Diary
At this point, you have now completed the steps for creating the frontend application that will use your Supabase project. Let's put what we've done so far to the test.
Launch your computer’s terminal and execute the command below to start the Gatsby development server.
yarn start
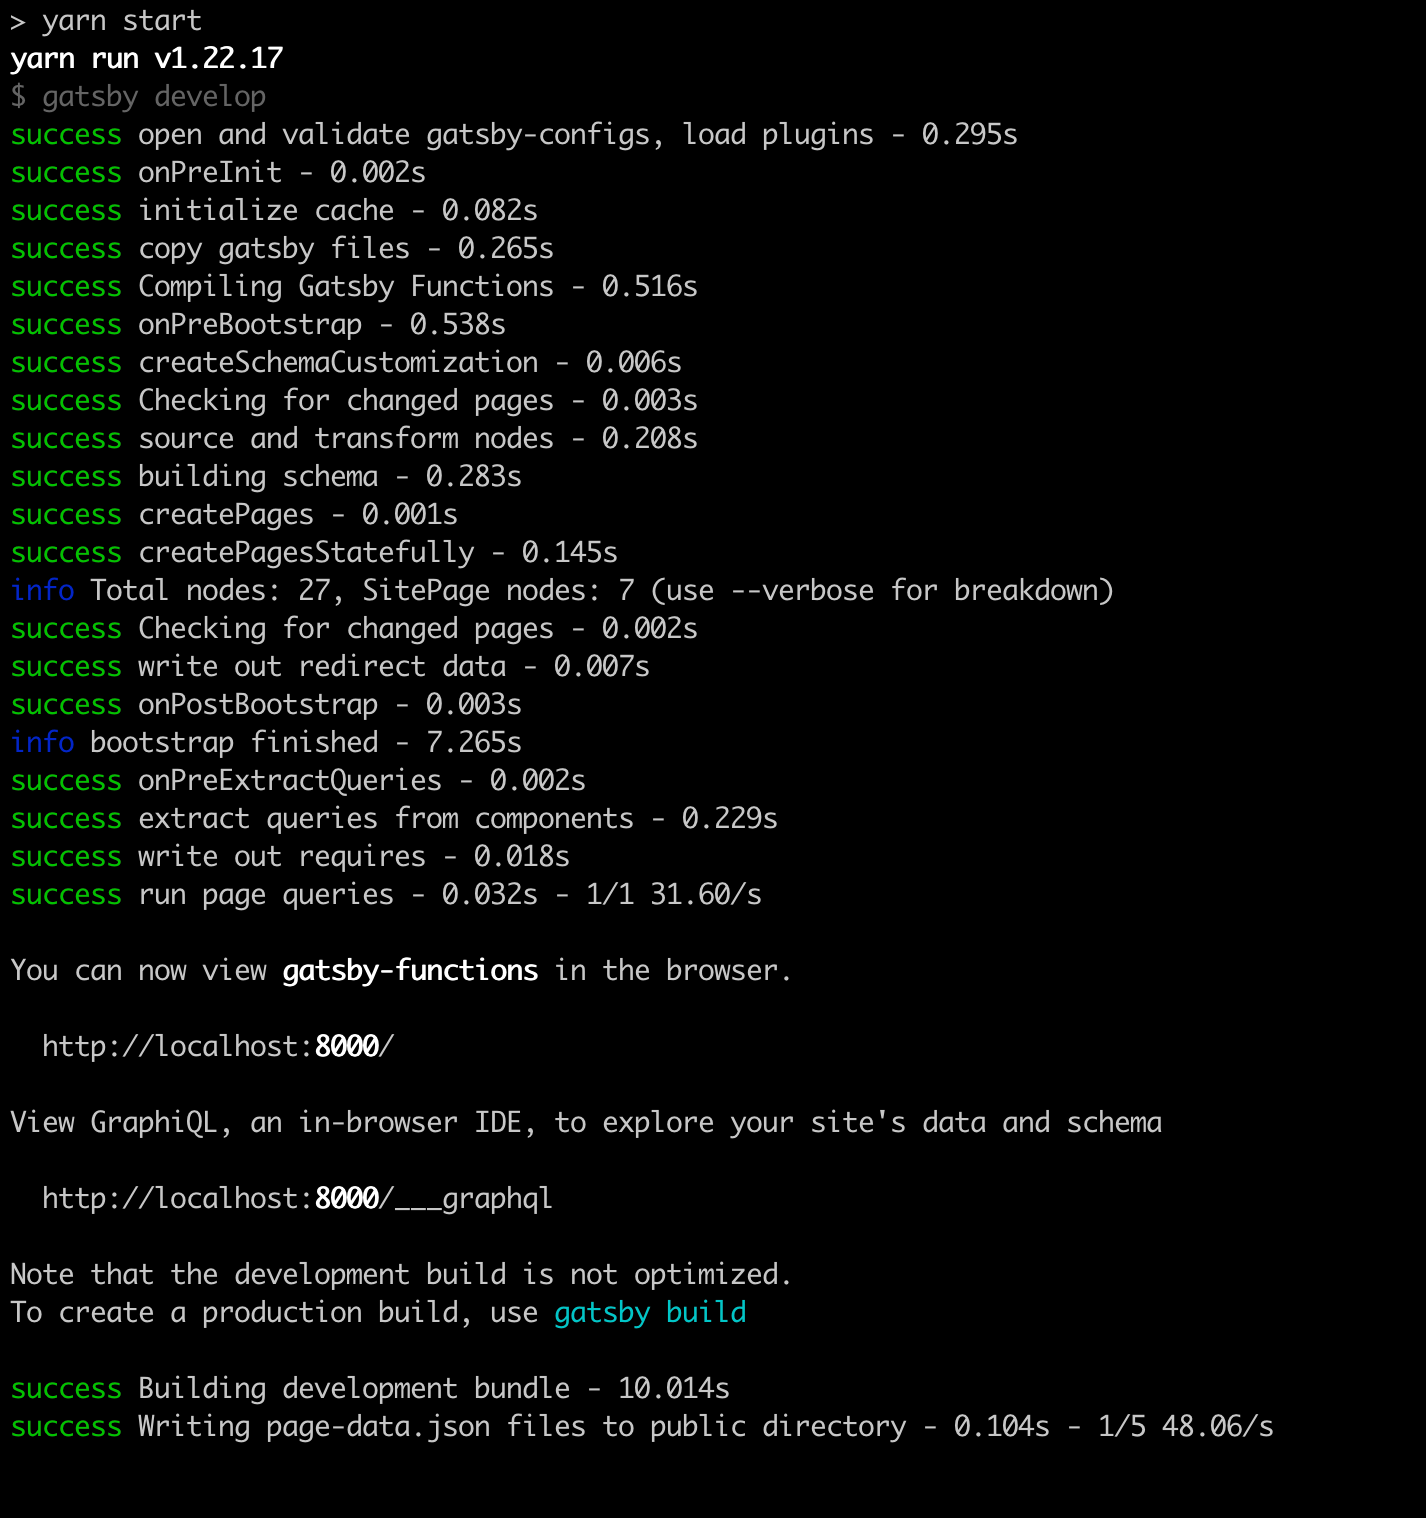
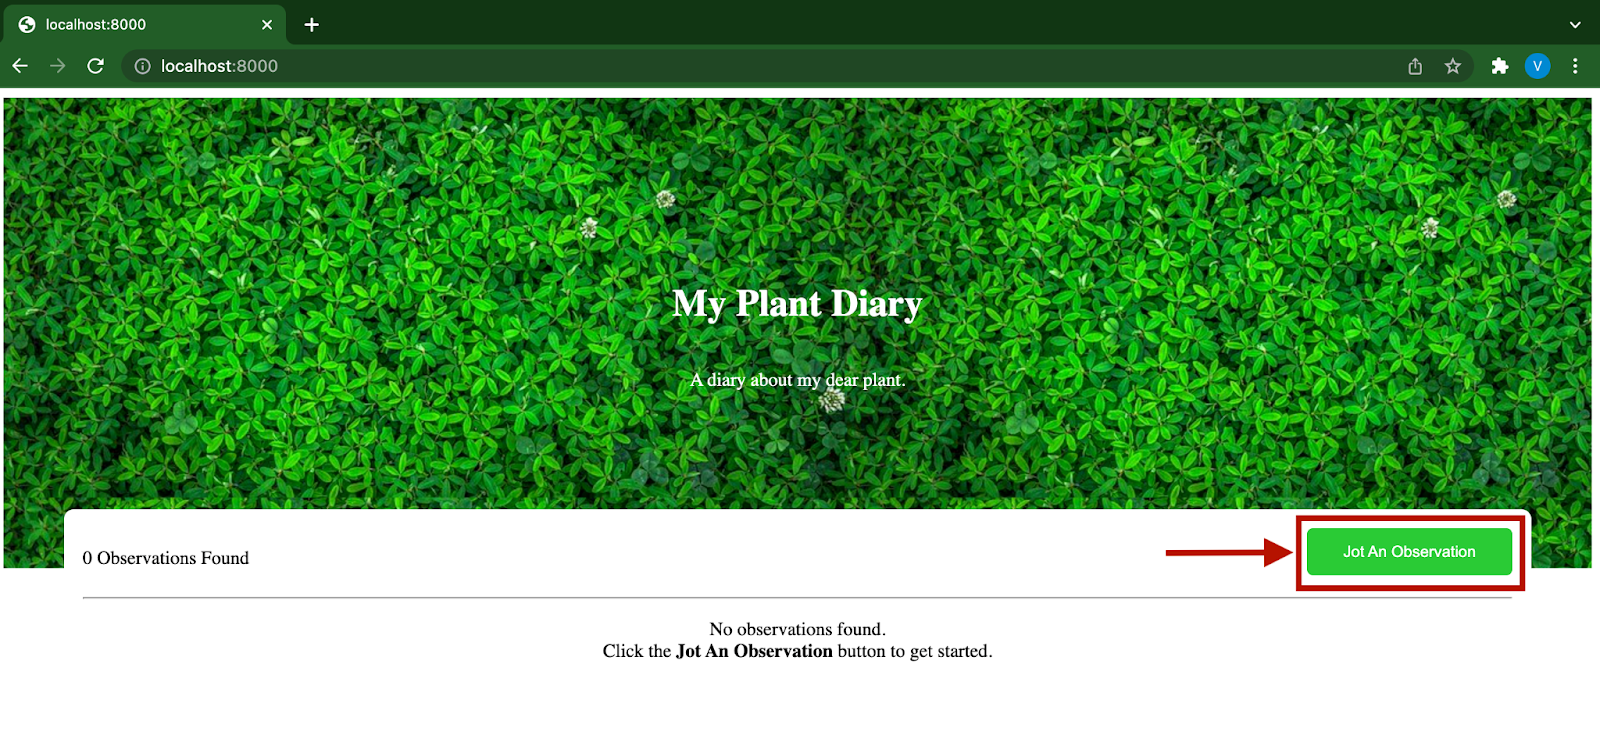
Navigate to the running Gatsby application at http://localhost:8000 to view the home page. The home page will be rendered without any plant observation. After you create your first observation, the observation data will be fetched and displayed using the DayObservation component.
Click the highlighted Jot An Observation button to create your first plant observation.
Click the Choose File button to select an image from your computer and type in the details for a sample plant observation taken for a day.
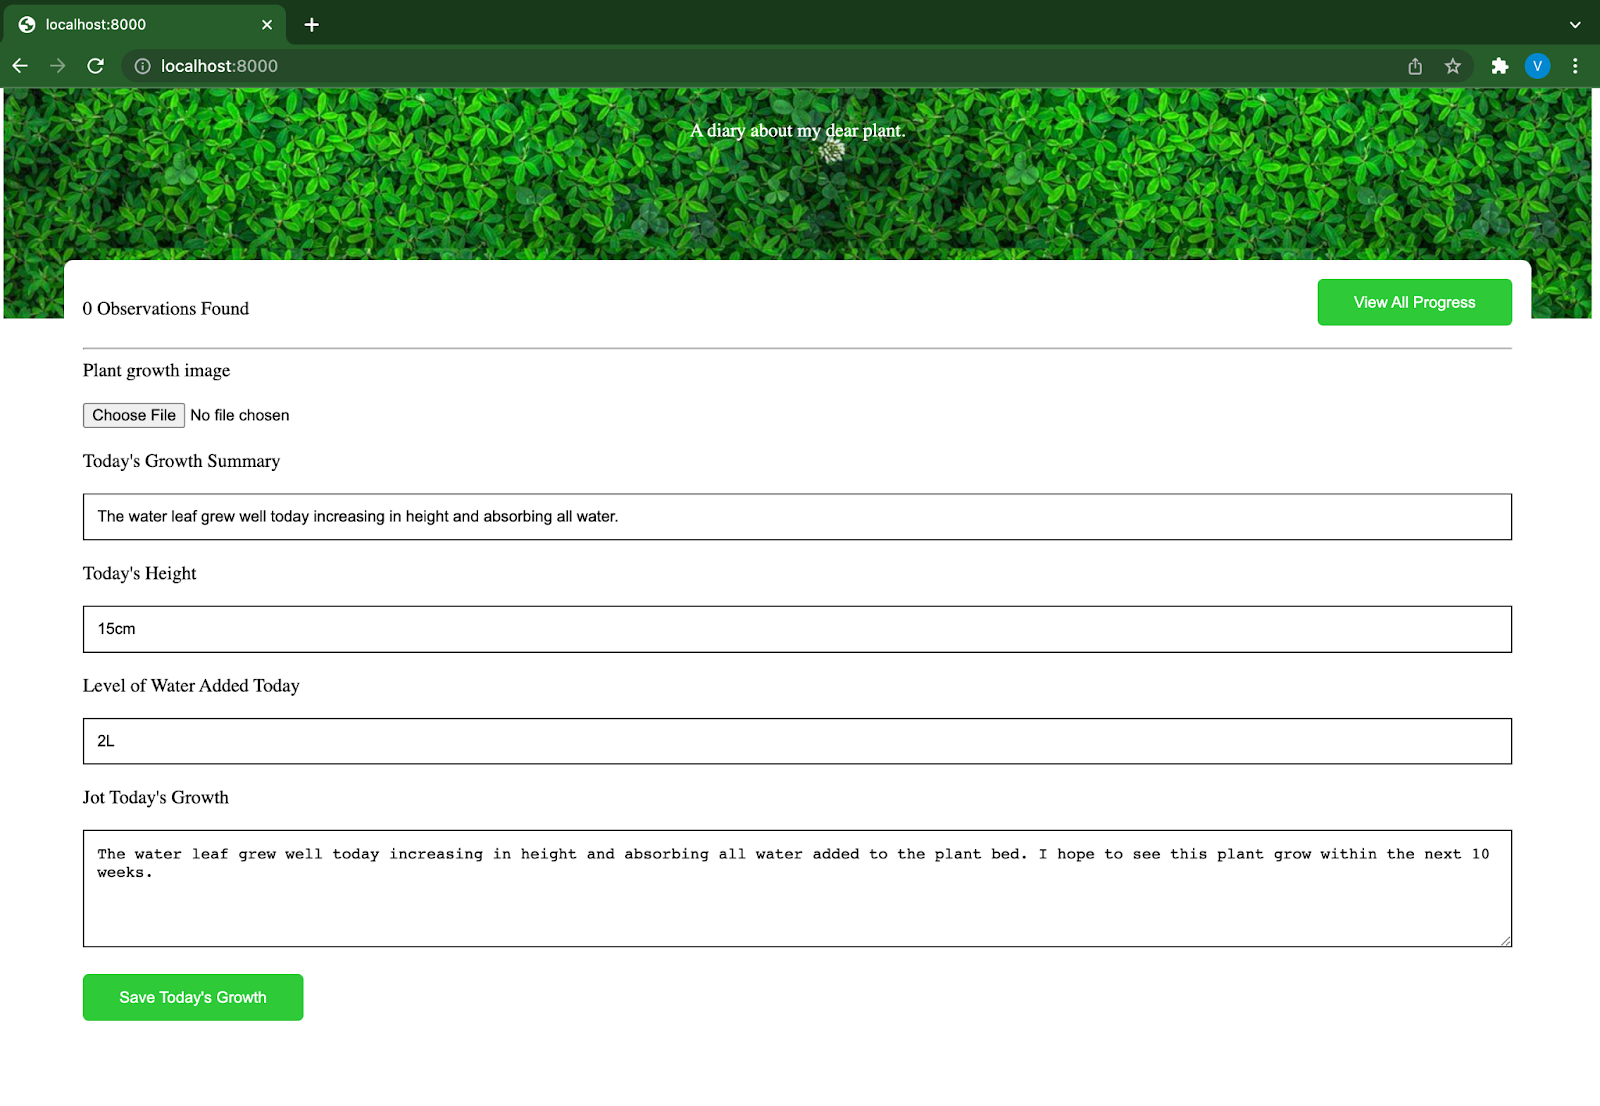
Click the Save Today’s Observation button to save the details provided into the postgres database and display the observation.

At this point, you have successfully integrated the Gatsby application into the backend project on Supabase. You can repeat the steps within this section to create more observations and populate the application.
Further Considerations
As demonstrated in this tutorial, you were able to create a basic backend application in a few minutes by leveraging Supabase, a backend as a service. The frontend application source code has been pushed into a GitHub repository for you to clone.
If you want to leverage the knowledge gained from this tutorial to build a more complex application, it is strongly recommended that you consider the following points:
Authentication and Authorization
To help you focus on integrating the Gatsby application with Supabase, user authentication was not covered within this tutorial. Supabase has several official and community authentication providers that can be integrated into an application to authenticate users.
Row Level Security
Supabase also provides a Row Level Security (RLS) feature that you could have applied to the Postgres database and the Storage bucket. Using RLS policies, you can ensure that users can only access and modify their personal data.
Database Schema and Data Validation
While creating the database schema, you maintained using a single table to store data. To improve the schema, you can further create a plant table and link it to the observations table using a Foreign Key (FK).
Ensure that the data from the input fields is validated by using a validation library such as Joi. This reduces the chances of a SQL injection and also avoids getting data type errors from the Postgres database.
Pagination
As the plant diary grows, the amount of data being fetched is expected to increase also. Fetching a large amount of data in a single request will increase the response time as Supabase will return 1000 rows by default.
The Supabase NPM package supports the use of filters with the select method to retrieve only the needed data. Learn how to use the range method to paginate data that is returned from a query.

